
Thursday, December 4, 2008
Saturday, September 20, 2008
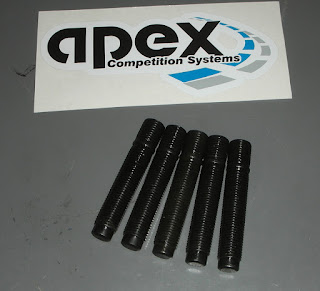
Spacer & Stud Kit Install
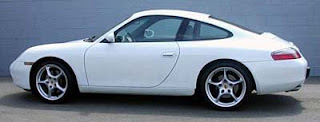
While we had already installed slightly wider Carrera 2 wheels on our 996, they still did not 'fill' fenders completly. Maximizing the track of the vehicle is almost always a benefit to handling plus a wide stance just looks better and is in keeping with our project's purpose of making our 996 as much like a GT3 as possible.

Keep in mind that the following recomendations are for the Carrera 2 wheels (or similar) shown below and for the original 996 twist wheels which are slightly narrower. Any other wheels such as GT3 or aftermarket (non-factory offset) wheels may need their own analysis to determine proper spacer & stud selection.

As an authorized H&R dealer, we have a full selection of wheel spacers from 7 to 45mm available to us. The goal was to widen the track to the width of a GT3 keeping the various tires sizes and wheel width options in mind.
We started with a 14mm H&R spacer which we trial fitted to both the front and the rear. Some have used a narrower 7mm spacer at the front of the 996 so we were hesitent to immediately put 14mm spacers on all 4 corners. However after testing the 14mm at all for corners and checking the clearances we determined this was well within fender. This also maintained the factory's original front to rear track difference and brought the tire out to about the same position it would be had we installed a set of wider and deeper offset GT3 wheels.

In the rear we determined that a slightly wider spacer could be used due to the additional fender clearance. So for our final setup we selected a 14mm spacer for the front and a 15mm spacer for the rear. An 18mm spacer could also have been used at the rear however we made a concession to the width as this car would also be regularly street driven. The concern was that 18mm would cause dirt and water coming off the wheel to splash down the side of the bodywork.

Any spacer for the Porsche 996 is going to require either longer wheel bolts or a conversion to a a stud & nut kit such as our "Track Stud" conversion kits. The first thing you need to do is determine what type of wheel nuts you will need. This will be determined by the type of wheels you have. If you have factory Porsche wheels you will need spherical seat wheel nuts such as those found on earlier Porsches. However if you have aftermarket wheels they often use a conical seat and you will therefore need a wheel nut with a matching 60 degree cone seat.

If you change your wheels often like we do then on of our ACS "Track Stud" wheel stud kits will make your lfe much easier. In addition to the extra strength affored you by these kits, repeatedly mounting a heavy wheel/tire combo become a "peice of cake". No more balancing the wheel on your foot while you struggle to thread that first wheel bolt in.
Monday, September 15, 2008
Sway Bars
In order to dial out some of the understeer of our 996 an adjustable H&R rear sway bar was installed. We left the original front bar alone as a larger front bar would just bring more understeer back into the equation.
 Removal of the original rear bar is simple and straight forward on the 996. Simply unbolt the inner pivot mounts and then disconnect the end links. Installation of the new H&R bar is simply the reverse.
 The H&R rear bar will give us the adjustability needed to help dial in the supension the allow more neutral handling. Unfortunately the H&R bar is thicker, solid and therefore heavy. The last thing we want is more weight in the rear of a 911. So eventually we will be locating a set of factory GT3 hollow sway bars. They are adjustable front and rear and very light.
Sunday, September 7, 2008
GT3 Brake Duct Spoilers
A quick, easy & inexpensive upgrade. The front brake ducts off a 996 GT3.

The 996 GT3 brake ducts have been altered to improve ventilation and therefore brake cooling. They are similar in size to the original 996 stock ducts, but these have more aggressive grooves to direct air more effectively to the brakes. There is an even more aggressive duct available from the 997 GT3 which also snaps right onto the 996 control arms. But this is the type (996) we are installing because it's what we have :)
Tuesday, September 2, 2008
GT3 Aero Kit Installation
The most obvious change in the transformation from a standard Carrera 2 to a GT3 look-a-like is without doubt the Mk1 Aerokit. The deep spoiler, side skirts and conspicuous rear wing totatally transform the look of the 996.
Below are a series of photos showing the progress. All work was done in house.
 The mk1 Aerokit body components are made from polyurethane while the rear wing is made from what appears to be a glass fiber composite. This is preferable for two reasons. One is that curbs and other cars wont destroy the parts on contact. And the other reason is we wanted to make sure the car was only fitted with original equipment Porsche parts. The mk1 Aero kit was an option for the early 996 C2.
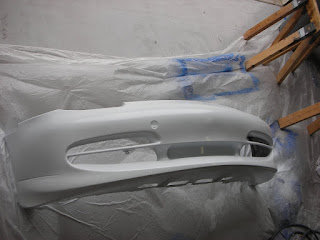
First, the slick polyurethane components were scuffed up with scotch brite to make sure the paint would adhear. Then we used a special sticky bonding agent called a "tie coat', that was sprayed on to make sure the paint would really bond to the flexible poly parts.
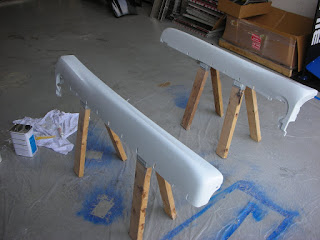 The side skirts were already primed and the tie coat acted as a primer, so there was no need for a special primer coat. We added a flex agent to the Glacier White paint so that it would not crack or flake should we ever come in contact with anything after installation. The base coat was laid on thin, allowed to "flash dry" for a few hours, then lightly sanded and the the final 2 base coats were added to give a thick flexible coat of Glacier White. These were allowed to dry overnight and the following day a liberal application of clear coat was applied. This provided the final protective barrier and would also allow for a durable high gloss shine.
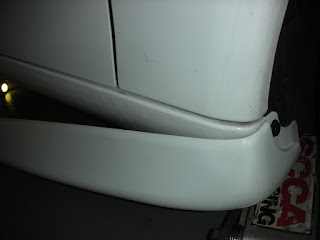 Installation of the side skirts is extremely simple. The old plastic stone guards are removed from the bottom of the rear rockers. The new side skirts are then fastened with Porsche body clips to the underside of the rocker panels and by plastic "rivets" to inside edges of the front and rear fender openings. Afterwards the backing tape is peeled off the inside of the side skirt which allows them to be bonded to the car all along the skirt's upper length.

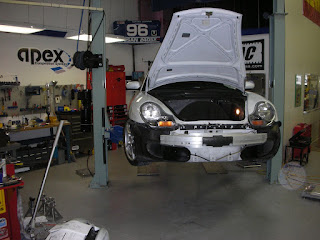 Fastening the front bumper to the car is a bit more involved than the side skirts but is still definately within reach of a 'garage mechanic' should you be thinking of attempting this yourself. First the side lights and head lights are removed. Then a number of self taping screws are removed all around the periphery of the original bumper. A few small bolts along the top where the hood lays and the old bumper should literally fall off the car.
Below are a series of photos showing the progress. All work was done in house.
 The mk1 Aerokit body components are made from polyurethane while the rear wing is made from what appears to be a glass fiber composite. This is preferable for two reasons. One is that curbs and other cars wont destroy the parts on contact. And the other reason is we wanted to make sure the car was only fitted with original equipment Porsche parts. The mk1 Aero kit was an option for the early 996 C2.
First, the slick polyurethane components were scuffed up with scotch brite to make sure the paint would adhear. Then we used a special sticky bonding agent called a "tie coat', that was sprayed on to make sure the paint would really bond to the flexible poly parts.
 The side skirts were already primed and the tie coat acted as a primer, so there was no need for a special primer coat. We added a flex agent to the Glacier White paint so that it would not crack or flake should we ever come in contact with anything after installation. The base coat was laid on thin, allowed to "flash dry" for a few hours, then lightly sanded and the the final 2 base coats were added to give a thick flexible coat of Glacier White. These were allowed to dry overnight and the following day a liberal application of clear coat was applied. This provided the final protective barrier and would also allow for a durable high gloss shine.
 Installation of the side skirts is extremely simple. The old plastic stone guards are removed from the bottom of the rear rockers. The new side skirts are then fastened with Porsche body clips to the underside of the rocker panels and by plastic "rivets" to inside edges of the front and rear fender openings. Afterwards the backing tape is peeled off the inside of the side skirt which allows them to be bonded to the car all along the skirt's upper length.


 Fastening the front bumper to the car is a bit more involved than the side skirts but is still definately within reach of a 'garage mechanic' should you be thinking of attempting this yourself. First the side lights and head lights are removed. Then a number of self taping screws are removed all around the periphery of the original bumper. A few small bolts along the top where the hood lays and the old bumper should literally fall off the car.
 Assembly of the new GT3 bumper cover is the reverse of removable with one exception. No two parts are ever the same. Especially when working with a 10 year old car. So while the new bumper cover should theoretically just slide into place, quite a bit of adjusting and and a tiny bit of trimming were required to get it to lay in place where we wanted it. All in all however , not a very difficult job.
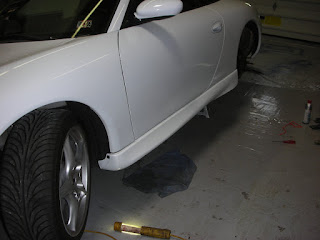
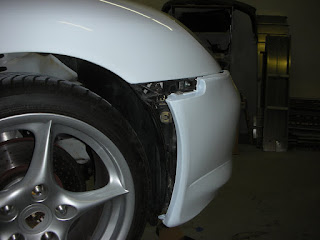 The final result... a 996 Carrera C2 tat looks lower, more aggressive and newer. The downside is that the car now looks unbalanced. Aero treatments to the front and sides now are really asking for that Aerokit rear wing!

 The final result... a 996 Carrera C2 tat looks lower, more aggressive and newer. The downside is that the car now looks unbalanced. Aero treatments to the front and sides now are really asking for that Aerokit rear wing!
Sunday, August 24, 2008
An Mk1 GT3 to aspire to...
Here are a few pics of an early mk1 GT3 that I found on a German website. This car looks very much like what we had in mind when this project started.


Friday, August 15, 2008
Brake Bleeding & Parking Brake Adjustment
As part of our gearbox and slave cylinder replacement a full fluid purge and refill with ATE Super Blue Racing fluid was in order. Therefore no time better than the present to take the opportunity to adjust the parking brake as well.
 Adjusting the parking brake on the 911 is similar to other drum brake adjutment procedures. Instead of another "how to" here I would highly recommend any Porsche owner to head over to http://www.renntech.org and set up an account. RennTech is a great resource for DIY tutorials and is THE place to go for technical Q&A about all things Porsche. Check it out.
 I often work on my Porsche alone and my wife is no longer thrilled about pumping the brake pedal during fluid changes. The Motive Bleeder to the rescue! This little unit really makes life easier. It is a simple one person power bleeder for your car. The Motive Products Power Bleeder (which we sell) requires no external power source and allows you to completely flush your hydraulic system without refilling. An accurate pressure gauge ensures safe operation. Pressure bleeding is the preferred method used by professionals and the Motive Power Bleeder will help you achieve those same professional results in minutes.
  The entire brake system was flushed and refilled by myself in less time than it normally would take two people using the old "one guy on the brake pedal, one guy shuffling between bleeders and reservoir" method. It's a must have.
All the tools and fluids show here are available from Apex Competition Systems. http://www.apexcompetition.com/
Sunday, August 10, 2008
New Clutch & Gearbox
Text will be added later
- New Slave Cyl

- Rebuilt Gearbox fixed pinion whine

- New SACHS clutch. The 6 puck SPEC was grabbing & chattering


Saturday, August 9, 2008
GT3 Aero Kit !!
Found a GT3 Aero Kit!
 The Carrera 2 and the GT3 share the same basic chassis & suspension. It's the gearbox and engine that really make the GT3 shine. The early 996 GT3 (which was never sold in the USA) had a 'body kit' installed from the factory which was also available on the 996 as an option. This option is commonly referred to as the "Aero Kit". This 'GT3' Aero Kit is comprised of a deeper, wider front spoiler, deep side skirts and a large rear wing. This whole package was developed in the Porsche windtunnel to help the GT3 with aerodynamics at racing speeds. It is not simply all show...but it does look cool :)
 Recently we were lucky enough to locate a set of early side skirts and a GT3 nose on EBay. These bits are all factory OEM Polyurethane components and not the cheaper fiberglass you sometimes see advertised. Since this is still a street car there is no substitute for original polyurethane. It can bump a curb or two, whereas fiberglass will be destoyed with even the slightest contact.
We also got a small carbon fiber chin spoiler which can bee seen in the photo above. This really adds a nice agressive look and will more importantly keep even more air from getting under the nose. Reducing lift at 100+ MPH is what it's all about !
 What we have not obtained yet is the GT3 rear wing. The verdict is still out on whether a "period" Aerokit wing (affectionately known as the "Taco Wing") such as was found on the street going GT3, or a far more functional GT3 Cup wing as found on the factory Carrera Cup race cars is a better choice. The race wing will produce more downforce but since this is still primarily a street car we may need to make a concession here depending on price availability, practicality, etc.
We'll be adding another post to this blog when we paint & install these parts...stay tuned!
Tuesday, July 8, 2008
Updating the Headlights
The amber turn signals were delivered on the earliest Bosters & 996 cars. Personally I dont like them at all. I like the new 997 headlights as they look more "classic 911" however this is a 996 so we're stuck with what we have. What we can do however is swap out these old faded yellowing headlights for a nice new set of clear lights with smoked turn signals and get rid of the amber. The smoked lights will look much better on our project car's White/Black color scheme.

How to install 996 Headlights.
It is really simple but I have heard all sorts of stories from people who did no research prior to attempting this and wound up breaking their lights. There are no screws or nuts to remove. You need to use Porsche's special tool that is included in the tool kit in each car.
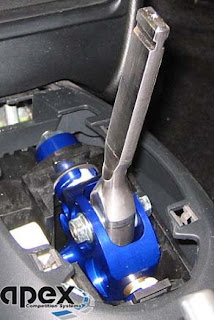
 First locate the plastic interior nut holding the carpet in place. After you remove the plastic finishing screw you will be able to pull down the carpet. Remove the rubber plug just to the right of the grounding wire to expose the headlight removal socket. In your Porsche Tool kit you will find a hollow 'hex' wrench with a handle. Insert the hex head into the socket as show with the handle hanging down.
Turn the handle counter-clockwise until you hear a "click" and see the headlight move out forward. You can then pull the headlight straight forward out of the car. It is located by plastic guide pins in a plastic channel. Assembly is simply the reverse procedure.

How to install 996 Headlights.
It is really simple but I have heard all sorts of stories from people who did no research prior to attempting this and wound up breaking their lights. There are no screws or nuts to remove. You need to use Porsche's special tool that is included in the tool kit in each car.
First locate the plastic interior nut holding the carpet in place. After you remove the plastic finishing screw you will be able to pull down the carpet. Remove the rubber plug just to the right of the grounding wire to expose the headlight removal socket. In your Porsche Tool kit you will find a hollow 'hex' wrench with a handle. Insert the hex head into the socket as show with the handle hanging down.Turn the handle counter-clockwise until you hear a "click" and see the headlight move out forward. You can then pull the headlight straight forward out of the car. It is located by plastic guide pins in a plastic channel. Assembly is simply the reverse procedure.
Wednesday, July 2, 2008
More Sparkle :)
I was lucky enough to find that "The Racer's Group" had just posted a set of the later model tail lights on their website. Something they had taken off a 996 shell for conversion into one of their full on race cars no doubt. It gives the rear of the car a nice updated look. The main difference is the replacement of the amber lense across the top with the newer clear/smoked lense.

Tuesday, June 24, 2008
Track Day #2 (w/ video)
Monday, Project 996 was back on track as ACS owner Bill Sulouff was instructing at the BeaverRun Motorsport complex. The corner weighting, pressure adjustments and the ride height adjustments which were carried out last week all made a positive improvement on the 996's handling. The cars seems to be handling about right now for a basically stock 996.
After a few sessions it became clear that in order to enhance the track handling of this car any further that some additional "balance" adjustments would be required. The car was being pushed hard enough now that we could tell it still had too much understeer coming out of the corners. Even when "tossed" a bit and accelerating hard there was some "push". Therefore it looks like some GT3 swaybars (or similar) are in the car's near future.
The Hawk HP Plus pads that we intalled were a definite improvement. The fade is mostly gone. However we still seem to getting some fade at the end of the longer straight as we brake hard for the hairpin. It's possible that this is related to something else so we'll be going through the front brake system before the next event.
Here is a video of a couple laps. Fabspeed muffler bypass "Track Pipes" were installed just for this one day. Unfortunately they are far too loud for everyday use :)
http://www.youtube.com/watch?v=p-qjbPflQ7o
Sunday, June 22, 2008
Track Prep 101
Monday is another track day at BeaveRun where Bill will be instructing so we spent a little time on the 996 this weekend attending to some things that were still not optimal. First off the brake pads that had been on the car for the first track day proved to be insufficient, fading after only about 4 hard laps. So we will be testing various compounds to see what works as advertised! First up is a set of Hawk HP Plus pads which are Hawk's Autocross and "Track Day" pads. Designed to be driven to and from the track and still perform well in normal street driving, these pads sound like they will be what we're looking for if they perform.
 Next on the agenda was getting the ride height and corner weights squared away. Given that this is the '996 to GT3 Project' we started out by setting the ride heights to roughly what is delivered on a Porsche GT3. 25.5" from the highest point of the wheel arches to the ground (tire contact patch).

After this was done we pulled the 996 onto our setup scales to check the corner weights. Way off! After a few hours of tweaking the H&R coil overs we stopped at what is a much better, but still a compromised setup. This is afterall a street car and not a race car. So getting 'perfect' corner weights may not be possible.

Next on the agenda was getting the ride height and corner weights squared away. Given that this is the '996 to GT3 Project' we started out by setting the ride heights to roughly what is delivered on a Porsche GT3. 25.5" from the highest point of the wheel arches to the ground (tire contact patch).After this was done we pulled the 996 onto our setup scales to check the corner weights. Way off! After a few hours of tweaking the H&R coil overs we stopped at what is a much better, but still a compromised setup. This is afterall a street car and not a race car. So getting 'perfect' corner weights may not be possible.
Tire pressures were also adjusted from the factory settings of 36F/44R to 32F/40R. The common wisdom is that this is a better setup reducing some understeer, improving grip and at the same time giving a better ride around town.
We'll see how it does and report back on Monday. To the track!
Thursday, June 19, 2008
Wednesday, June 18, 2008
B&M Short Shifter Installed
You think the shifting of your 996 is already as good as sports cars get? Think again! We just installed a B&M shifter into ACS Project 996 and wow, what a difference. The shifting has gone from excellent to 'PERFECT'.
The shifter is supplied with everything needed to install plus the included B&M instruction manual which is excellent. Plenty of detailed photos and it covers every step of the process very well. The shifter takes about 1 hour to install with basic hand tools.
Once on and adjusted, the driving feel is much improved. 1-2, 3-4 and 5-6 shifts are now made with a very quick and decisive "snik, snik" that you'd expect from a racing shifter. The gate width between 2-3, 4-5 shifts is reduced but the "feel" for these gears is actually improved. The shifting effort is not noticibly increased and it remains easy to throw into the gears. The B&M shifter reduces much of the 'play' giving it a nice firm feel.
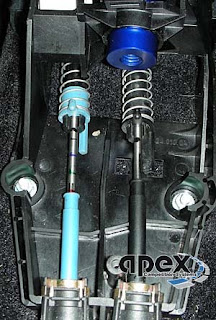
One word of advice. While it is outlined in the instructions, it is very important that you mark the location of the cable shafts prior to disassembly. Failure to do so can make adjustment once assembled much more time consuming. We found that even a 1 or 2mm change in adjustment at the cable attachment points created a difference you could really feel in where and how far the shifter engaged.
Monday, June 16, 2008
BMC Panel Filter

We had a BMC panel filter laying around unused so we popped it in this weekend. This filter has a very nice soft silicone type seal all around the edge. This filter appears to be very similar to the excellent "Green" Brand filters we recommend. Great fit, quality materials, recommended.
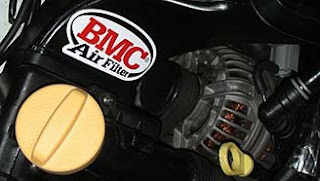
Later we will be installing the EVOMS cold air intake. The EVOMS intake is a true ducted cold air intake with a low restriction cone filter feeding a radiused intake trumpet attached to the throttle body hose. The Grand-Am Cup teams use the EVOMS intake. We'll be dyno'ing it later.
Tuesday, June 10, 2008
New Wheels
Never been a big fan of the "Twist" wheels found on the early 996 cars like ours. They are relatively heavy and also narrower than some of the other wheel options.
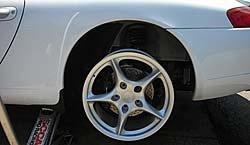
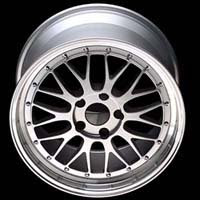 We'd love to put a set of BBS LM wheels on the car but at $1000 each that's not going to happen soon. We do sell a BBS LM "replica" wheel for 1/4 the price. However what we've decided to go with are the 'Carerra 2' wheels that were delivered on the '02 and up 996 cars. We sell a refurbished "new" version of this wheel that is lighter and wider than the "Twist" and since the price is right they were selected.
The "Twists" may be powder coated black to use as track wheels even though they are narrow and heavier. No sense in buying a perfectly good set of wheels for track abuse when we're not really racing. Those last 10ths of a second are not the objective.
Subscribe to:
Comments (Atom)
