
Below are a series of photos showing the progress. All work was done in house.
 The mk1 Aerokit body components are made from polyurethane while the rear wing is made from what appears to be a glass fiber composite. This is preferable for two reasons. One is that curbs and other cars wont destroy the parts on contact. And the other reason is we wanted to make sure the car was only fitted with original equipment Porsche parts. The mk1 Aero kit was an option for the early 996 C2.
First, the slick polyurethane components were scuffed up with scotch brite to make sure the paint would adhear. Then we used a special sticky bonding agent called a "tie coat', that was sprayed on to make sure the paint would really bond to the flexible poly parts.
 The side skirts were already primed and the tie coat acted as a primer, so there was no need for a special primer coat. We added a flex agent to the Glacier White paint so that it would not crack or flake should we ever come in contact with anything after installation. The base coat was laid on thin, allowed to "flash dry" for a few hours, then lightly sanded and the the final 2 base coats were added to give a thick flexible coat of Glacier White. These were allowed to dry overnight and the following day a liberal application of clear coat was applied. This provided the final protective barrier and would also allow for a durable high gloss shine.
 Installation of the side skirts is extremely simple. The old plastic stone guards are removed from the bottom of the rear rockers. The new side skirts are then fastened with Porsche body clips to the underside of the rocker panels and by plastic "rivets" to inside edges of the front and rear fender openings. Afterwards the backing tape is peeled off the inside of the side skirt which allows them to be bonded to the car all along the skirt's upper length.


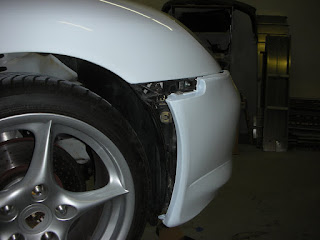
 Fastening the front bumper to the car is a bit more involved than the side skirts but is still definately within reach of a 'garage mechanic' should you be thinking of attempting this yourself. First the side lights and head lights are removed. Then a number of self taping screws are removed all around the periphery of the original bumper. A few small bolts along the top where the hood lays and the old bumper should literally fall off the car.
 Assembly of the new GT3 bumper cover is the reverse of removable with one exception. No two parts are ever the same. Especially when working with a 10 year old car. So while the new bumper cover should theoretically just slide into place, quite a bit of adjusting and and a tiny bit of trimming were required to get it to lay in place where we wanted it. All in all however , not a very difficult job.
 The final result... a 996 Carrera C2 tat looks lower, more aggressive and newer. The downside is that the car now looks unbalanced. Aero treatments to the front and sides now are really asking for that Aerokit rear wing!

 The final result... a 996 Carrera C2 tat looks lower, more aggressive and newer. The downside is that the car now looks unbalanced. Aero treatments to the front and sides now are really asking for that Aerokit rear wing!


 First locate the plastic interior nut holding the carpet in place. After you remove the plastic finishing screw you will be able to pull down the carpet. Remove the rubber plug just to the right of the grounding wire to expose the headlight removal socket. In your Porsche Tool kit you will find a hollow 'hex' wrench with a handle. Insert the hex head into the socket as show with the handle hanging down.

